On this page
About pointer mode
In pointer mode, you aim the device at the computer screen, and the pointer moves where you aim. The gyroscope of the device measures each turn of your hand. You click and scroll with large buttons on the screen of the device.
Use pointer mode when you are away from the computer: for a presentation, or for a computer that shows on a TV. For work at a desk, touchpad mode is usually easier.
To open pointer mode, tap the mode button in the toolbar. Then tap Pointer.
The screen
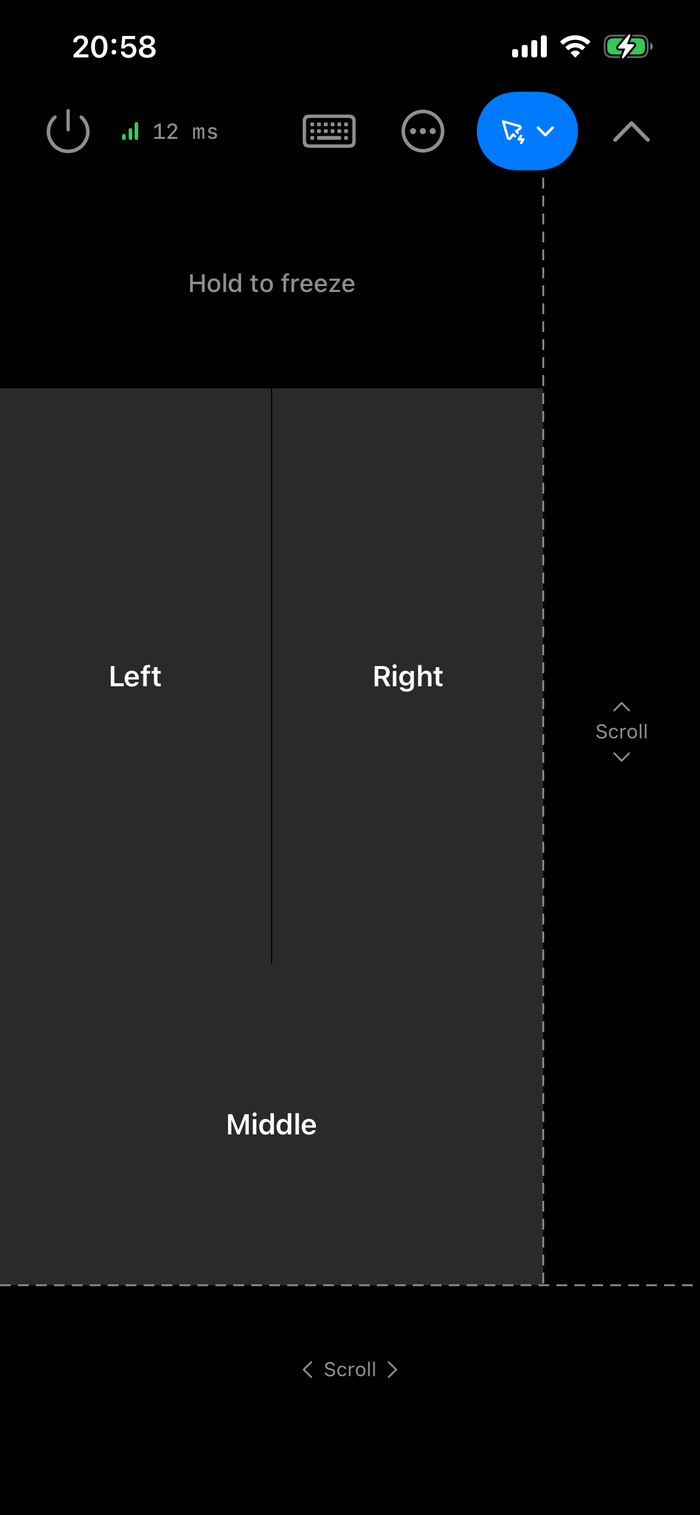
The Standard layout has six controls:
- Hold to freeze, at the top. See Hold to freeze.
- Left and Right, the two large buttons in the center.
- Middle, below them.
- A vertical Scroll strip, on the right edge.
- A horizontal Scroll strip, along the bottom edge.
You can move, resize and hide each control, and add keys. See Edit the layout.
The toolbar
The toolbar shows icons. The table gives the name that VoiceOver speaks for each icon.
| Control | What it does |
|---|---|
| Disconnect (power icon) | Ends the connection and goes back to the server list. |
| Connection (signal bars and a time) | Shows the quality of the connection. Tap it to see the details of the server and the connection. See Connection state. |
| Layouts (folder icon) | Opens Pointer Layouts. See Save, load and reset layouts. |
| Calibrate aim (target icon) | Starts the calibration. See Absolute pointing and calibration. |
| Edit layout (grid icon) | Opens and closes the layout editor. |
| Keyboard (keyboard icon) | Opens or closes the keyboard. See Type on the computer. |
| Settings (gear icon) | Opens the settings on the Pointer page. |
| Mode button | Changes the mode. |
| Hide toolbar (up arrow, at the right end) | Hides the toolbar. To show it again, tap the tab in the top right corner (Show toolbar). |
When the screen is narrow, Layouts, Calibrate Aim, Edit Layout and Settings move into the More controls menu (a circle with three dots). This is usual on an iPhone. Keyboard stays on the toolbar. While the layout editor is open, Edit layout is on the toolbar in place of Keyboard.
The controls do not move when the toolbar hides or comes back.
Aim the device
Hold the device as a remote control. Point its top edge at the computer screen.
- Turn the device left or right: the pointer moves left or right.
- Tilt the top edge up or down: the pointer moves up or down.
- A twist around the long axis of the device does not move the pointer.
You can hold the device with the screen up, or turned on its side. The app reads how you hold it, and up stays up.
If you point the device almost straight up or straight down, the pointer slows and stops. Hold the device nearer to level.
The app reads the gyroscope only while pointer mode is on the screen. When the app goes to the background, the pointer stops.
Controls and gestures
| Gesture | Result on the computer |
|---|---|
| Turn or tilt the device | The pointer moves. |
| Touch and hold Left | The left button goes down. It comes up when you lift the finger. A short tap is a left click. |
| Touch and hold Right | The right button goes down. A short tap is a right click. |
| Touch and hold Middle | The middle button goes down. A short tap is a middle click. |
| Hold Left and turn the device | Drag. |
| Move a finger up or down in the vertical Scroll strip | Vertical scroll. |
| Move a finger left or right in the horizontal Scroll strip | Horizontal scroll. |
| Touch and hold Hold to freeze | The pointer stops. It moves again when you lift the finger. |
| Touch and hold a custom key | The keys of the custom key go down. They come up when you lift the finger. See Modifier keys and custom keys. |
To double-click, tap Left two times quickly.
The Scrolling setting changes how the strips scroll. See Scroll in steps or continuously.
To change the speed of the pointer, change Horizontal Sensitivity and Vertical Sensitivity. See Pointer settings.
Hold to freeze
While you touch and hold Hold to freeze, the pointer does not move. The area shows Frozen. When you lift the finger, the pointer moves again from the same position.
Use it as you lift a mouse from the desk:
- Touch and hold Hold to freeze.
- Turn your hand back to a comfortable position.
- Lift the finger.
- Aim again from the new position.
The turns that you make while the pointer is frozen are not added.
A steady pointer
A hand that holds still shakes slightly. Without a filter, the pointer shakes with it. Stabilization removes this shake.
- When your hand is almost still, the filter smooths the movement strongly. The pointer stays still.
- When you aim on purpose, the filter becomes weaker. The pointer follows quickly.
- The filter does not lose movement. The pointer arrives where you aim, slightly later.
Stabilization is on the Pointer settings page. The range is Off (0) to 10. The default is 10.
- A higher value makes the pointer steadier. It also follows a slow hand more slowly.
- A lower value makes the pointer follow faster, with more shake.
- Off removes the filter.
Hold the pointer when you click
A finger that touches a button also moves the device slightly. Thus, when a finger touches or leaves a control, the pointer holds its position for a short time. The click goes to the point where you aimed, and not to the point where the tap pushed the device. The turn that you make during the hold is not lost: the pointer moves after the hold.
Click Hold on the Pointer settings page sets this time. The range is Off (0) to 500 ms. The default is 150 ms. It works also when Stabilization is off.
- If a click goes to the wrong point, make the time longer.
- If the pointer starts a drag too late, make the time shorter.
Absolute pointing and calibration
With Absolute Pointing on, the pointer goes to the point on the screen that you aim at. To make this correct, calibrate from the place where you sit. The calibration measures how far you turn the device from one corner of the screen to the other.
Calibrate the aim
- Sit where you will use pointer mode.
- Tap Calibrate aim (target icon) in the toolbar. On a narrow screen, tap More controls, then tap Calibrate Aim.
- The app shows Corner 1 of 4. The pointer on the computer goes to the top left corner.
- Aim at the top left corner of the computer screen.
- Hold the device still and tap Mark Corner.
- Do steps 4 and 5 again for the top right corner, the bottom right corner and the bottom left corner. The app tells you which corner is next.
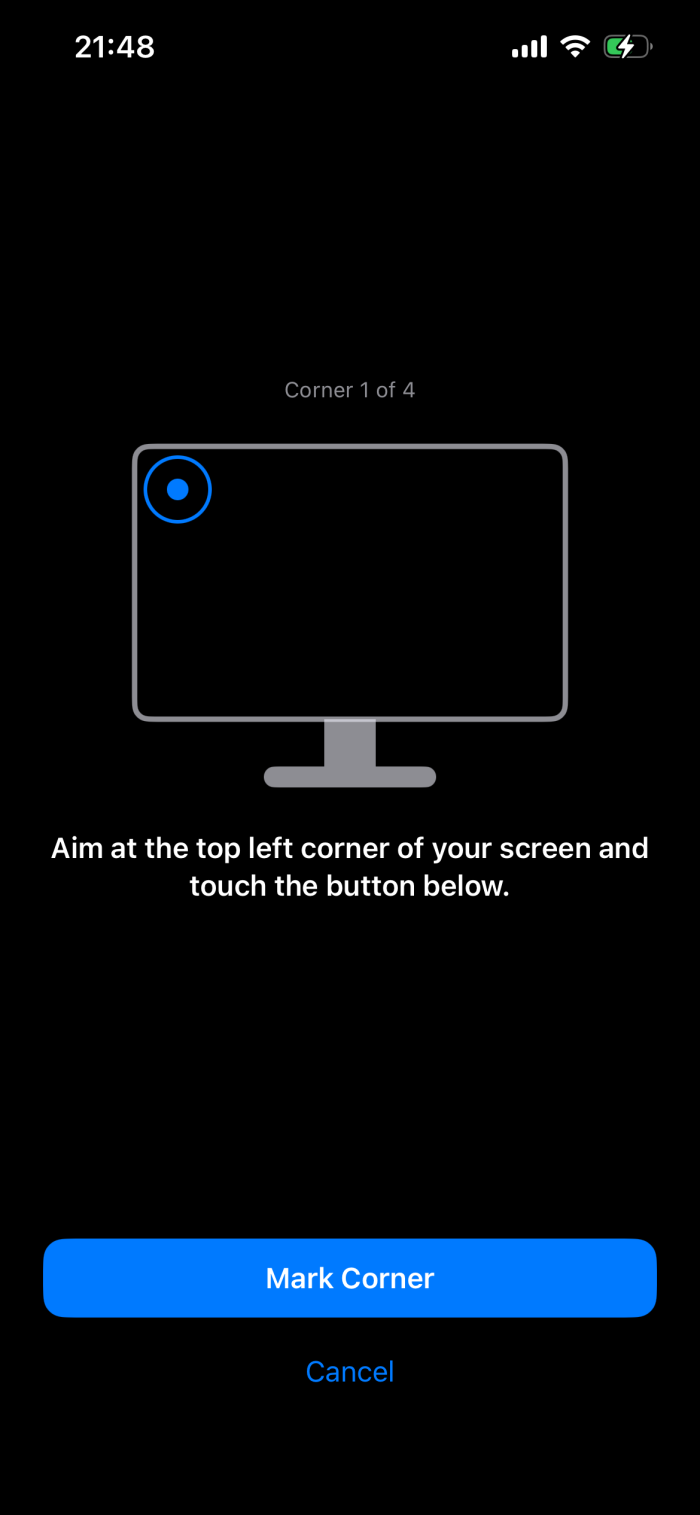
After the fourth corner, the app turns on Absolute Pointing. It also sets Horizontal Sensitivity and Vertical Sensitivity for absolute pointing. The pointer is at the bottom left corner, where you aim.
During the calibration, the app hides the mouse buttons and the toolbar. Thus you cannot click by accident. To stop, tap Cancel. The settings do not change.
If the corners are too near each other, or not in the correct order, the app shows "The corners were too close together, or out of order. Start again at the top left corner." Start again at Corner 1 of 4.
The app keeps Absolute Pointing and its calibration for each server. Calibrate again if you sit in a different place, or if you use a different screen.
Type on the computer
Pointer mode has a keyboard. The text that you type goes to the computer. The app does not keep it.
- Aim at the text field on the computer and tap Left.
- Tap Keyboard in the toolbar.
- Type on the keyboard of the device.
- To close the keyboard, tap Keyboard again, or use the key that closes the iOS keyboard.
A row above the keyboard gives Esc, Tab and the four arrow keys.
While the keyboard is open, the controls become shorter and stay above it. Thus you can aim and click while you type. The toolbar does not hide.
The keyboard closes when you open the layout editor or start the calibration. Each letter goes to the computer as it does in touchpad mode. See Type on the computer in touchpad mode.
Modifier keys and custom keys
Pointer mode has no modifier row. To press Ctrl, Shift, Alt or a different key, add a custom key to the layout.
A custom key holds its keys down while you touch it. When you lift the finger, the keys come up. For example, a custom key with Ctrl works as a Ctrl key: hold it and tap Left for Ctrl+click. A custom key with Ctrl and C sends Ctrl+C.
A custom key with more than one action in a stage presses the keys of each action at its time on the Wait slider, and they stay down until you lift the finger. If you lift the finger during a wait, the actions that did not start do not run. See Wait between actions.
A custom key can have more than one stage. Each touch then sends the next stage. The key editor is the same as the button editor in pencil mode. See The button editor.
The server changes each modifier to the key of its operating system. For example, the Meta key is Command on macOS, the Win key on Windows and Super on Linux. Alt is Option on macOS.
Edit the layout
In the layout editor, you can move, resize and hide each control, and add, change and delete custom keys.
Open and close the editor
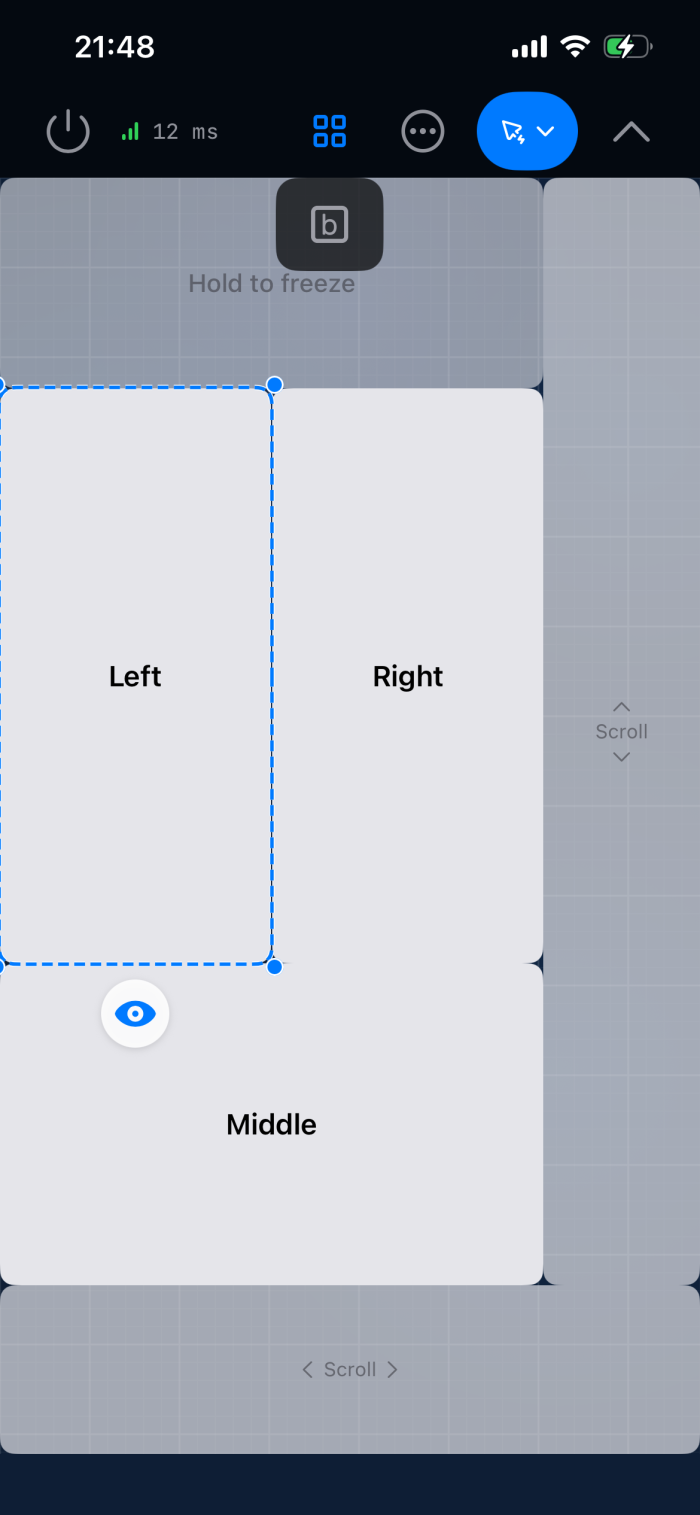
- Tap Edit layout (grid icon) in the toolbar. On a narrow screen, tap More controls, then tap Edit Layout. The controls show on a blue grid. Add key (plus icon) shows below Edit layout.
- Make the changes.
- Tap Edit layout again. The app closes the editor and keeps your changes.
If you edit the Standard layout, the app does not change it. It saves your changes as a new layout with the name Custom Layout, and uses it. If that name is in use, the app adds a number. If you close the editor with no change, the app saves nothing.
If you edit a layout that you saved, the app keeps your changes, also when you change mode or close the app. It does not write them into the saved layout until you tap Overwrite "name" or Save As…. To go back to the saved version, tap Revert "name". See Save, load and reset layouts.
What you can do in the editor
| Action | How |
|---|---|
| Select a control | Tap it. The control gets a dashed border and a dot on each corner. Buttons show below it. |
| Clear the selection | Tap the grid. For a standard control, you can also tap it again. |
| Move a control | Drag the control. If the control is too tight to grab, a move handle shows below it. Drag the handle. |
| Resize a control | Select the control. Drag a corner dot. |
| Hide or show a control | Select the control. Tap the eye button below it. A hidden control shows a cross in the editor, and it is not on the screen in pointer mode. |
| Add a custom key | Tap Add key. The New Button sheet opens. Give the key a name in Button name, tap Add Action, select the keys, then tap Save. The key shows in the middle of the canvas. |
| Change a custom key | Select the key. Tap the pencil button below it, or tap the key again. The Edit Button sheet opens. |
| Change the corners of a custom key | Select the key. Move the Radius slider. At the maximum, the key is round. |
| Delete a custom key | Select the key. Tap the red cross button below it. In the Delete key alert, tap Delete. |
When you move or resize a control, it aligns with the edges of other controls, and lines show the alignment. A control cannot go past the edge of the screen. Each control has a minimum size.
You cannot delete the six standard controls. You can only hide them.
Portrait and landscape
A pointer layout has a portrait arrangement and a landscape arrangement. The editor changes the arrangement for the current shape of the screen. A custom key that you add or delete goes into both arrangements. A move or a resize changes only the current arrangement.
On an iPhone, pointer mode is always in portrait. The landscape arrangement is for the iPad. See iPhone, iPad and orientation.
Save, load and reset layouts
Tap Layouts (folder icon) in the toolbar. On a narrow screen, tap More controls, then tap Layouts. The Pointer Layouts sheet opens.
| Item | What it does |
|---|---|
| A layout row | Tap it to use that layout. A check mark shows the layout in use. If you have changes that you did not save, the Unsaved changes message shows. Tap Discard to load the layout and lose the changes. Tap Cancel to keep the changes. |
| Standard | The layout that comes with the app. It shows Built-in. You cannot rename or delete it. |
| Save As… | Saves the current layout with a new name. Type the name in Layout name, then tap Save. |
| Overwrite "name" | Saves the current layout over the saved layout in use. It shows only for a layout that you saved. |
| Revert "name" | Loads the last saved version of the layout in use again. The Revert changes alert asks you first. |
| The menu on a row (circle with three dots) | Rename or Delete that layout. You can also swipe left on the row. |
| Done | Closes the sheet. |
Go back to the standard layout
- Tap Layouts.
- Tap Standard.
The app uses the standard layout again. The layouts that you saved stay in the list. To remove a layout, delete it.
iPhone, iPad and orientation
- Pointer mode works on the iPhone and on the iPad. You aim the full device, thus an iPhone is easier to hold and aim with one hand.
- On an iPhone, pointer mode is always in portrait. It does not turn with the device.
- On an iPad, the system can ignore the portrait lock. The app then uses the landscape arrangement of the layout when the screen is wider than it is tall. This is also true in a window that you resize.
- On an iPhone, Layouts, Calibrate Aim, Edit Layout and Settings are in the More controls menu. On an iPad in full screen, they are on the toolbar.
- While the layout editor or the Pointer Layouts sheet is open, the toolbar does not hide automatically. For the defaults, see Auto-Hide in General settings.
Scroll in steps or continuously
A mouse wheel turns in notches. Each notch moves the page by a fixed distance. Some wheels and all laptop touchpads move the page smoothly. Scrolling on the Pointer settings page tells the computer which of the two to do when you move a finger in a Scroll strip.
- Step by Step (the default): the page moves one notch at a time, as with a mouse wheel. This works in all apps.
- Continuous: the page moves smoothly with your finger. Many apps, for example web browsers, can do this. Some apps move one full notch for each small movement. In these apps, the page scrolls too far. If that occurs, select Step by Step.
On Windows, a window that runs as administrator gets Step by Step scrolling, also when you select Continuous.
This setting is only for pointer mode. Touchpad mode does not use it.
Pointer settings
Tap Settings in the toolbar. The Pointer page opens.
| Setting | What it does | Default |
|---|---|---|
| Absolute Pointing | On: the pointer goes where you aim the device. Off: each turn moves the pointer by an amount, as a mouse does. A calibration turns it on. Kept for each server. | Off |
| Horizontal Sensitivity | How far the pointer moves left and right for one turn. The range is 1 to 100. Absolute pointing has its own value, and a calibration sets it. Kept for each server. | 30 (absolute: 20) |
| Vertical Sensitivity | How far the pointer moves up and down for one tilt. The range is 1 to 100. Absolute pointing has its own value, and a calibration sets it. Kept for each server. | 15 (absolute: 35) |
| Stabilization | Removes the shake of your hand. See A steady pointer. The same for all servers. | 10 (range Off to 10) |
| Click Hold | How long the pointer holds still when you touch a control. See Hold the pointer when you click. The same for all servers. | 150 ms (range Off to 500 ms) |
| Scrolling | How the Scroll strips scroll: one notch at a time, or smoothly. See Scroll in steps or continuously. The same for all servers. | Step by Step |
| Invert Button Order | Puts the three mouse buttons of touchpad mode in the order Right, Middle, Left. It does not change pointer mode: to move the buttons of pointer mode, use the layout editor. The same for all servers. | Off |
The page shows the two sensitivity sliders for the mode that is on. Turn off Absolute Pointing to see the values for the usual mode.
The app keeps Absolute Pointing, Horizontal Sensitivity and Vertical Sensitivity for each server. Thus you must be connected to change them. Without a connection, the page shows them dimmed. See Settings for each server.
For Haptic Feedback, Auto-Hide and Hide Delay on the General page, see General settings.