On this page
What the computer needs
In gamepad mode, the server makes a virtual game controller on the computer. Games see it as a controller that is connected to the computer. What the computer sees is different on each operating system.
| Computer | What the computer sees | What you must do |
|---|---|---|
| Windows | An Xbox 360 controller. | Install the gamepad driver, ViGEmBus, one time. See The Windows driver. |
| Linux | A game controller with the name Ilopad Virtual Gamepad. Its buttons have the Xbox positions: A is the bottom button, Y is the top button. | Nothing more. The server makes the controller in the same way that it makes the virtual mouse and keyboard. |
| macOS | No controller. | Gamepad mode is not available on macOS. See macOS. |
The Windows driver
ViGEmBus is an open-source Windows driver. It lets the server make a virtual Xbox controller. The server does not install it without your approval. You can install it in two ways.
When you install the server
The Windows installer shows an Optional components: group. Select Install the gamepad driver (ViGEmBus), so the iPad can act as a game controller. This option is off by default. Windows asks for permission to install it.
From the app
- Connect the app to the server.
- Tap the mode button at the right of the toolbar.
- Tap Gamepad. The card Gamepad needs a driver opens.
- Tap Install Driver.
- On the computer, approve the Windows permission prompt.
- Wait. When Windows has installed the driver, the app opens gamepad mode.
If the installation fails, the card shows The driver was not installed. Check the computer for a permission prompt, then try again. Tap Try Again. If no result arrives in 90 seconds, the card also shows this message.
If you do not want the driver, tap Not Now. Touchpad, pointer and pencil modes work without it.
If the driver is on the computer but the server cannot make a controller, the app shows Gamepad not available on this computer. The server log gives the cause. See Logs.
macOS
The server for macOS cannot make a virtual game controller yet. When you connect to a Mac:
- The mode menu does not show Gamepad.
- If the app was in gamepad mode, it changes to touchpad mode. The card Gamepad not available on this computer tells you why.
- Touchpad, pointer and pencil modes work normally.
The Gamepad tab of the Input Testing window still works on a Mac. It shows the controllers that are connected to the Mac. See Test the gamepad.
The gamepad screen
Gamepad mode works on the iPhone and on the iPad, in landscape and in portrait. The app has a different arrangement of the controls for each orientation.
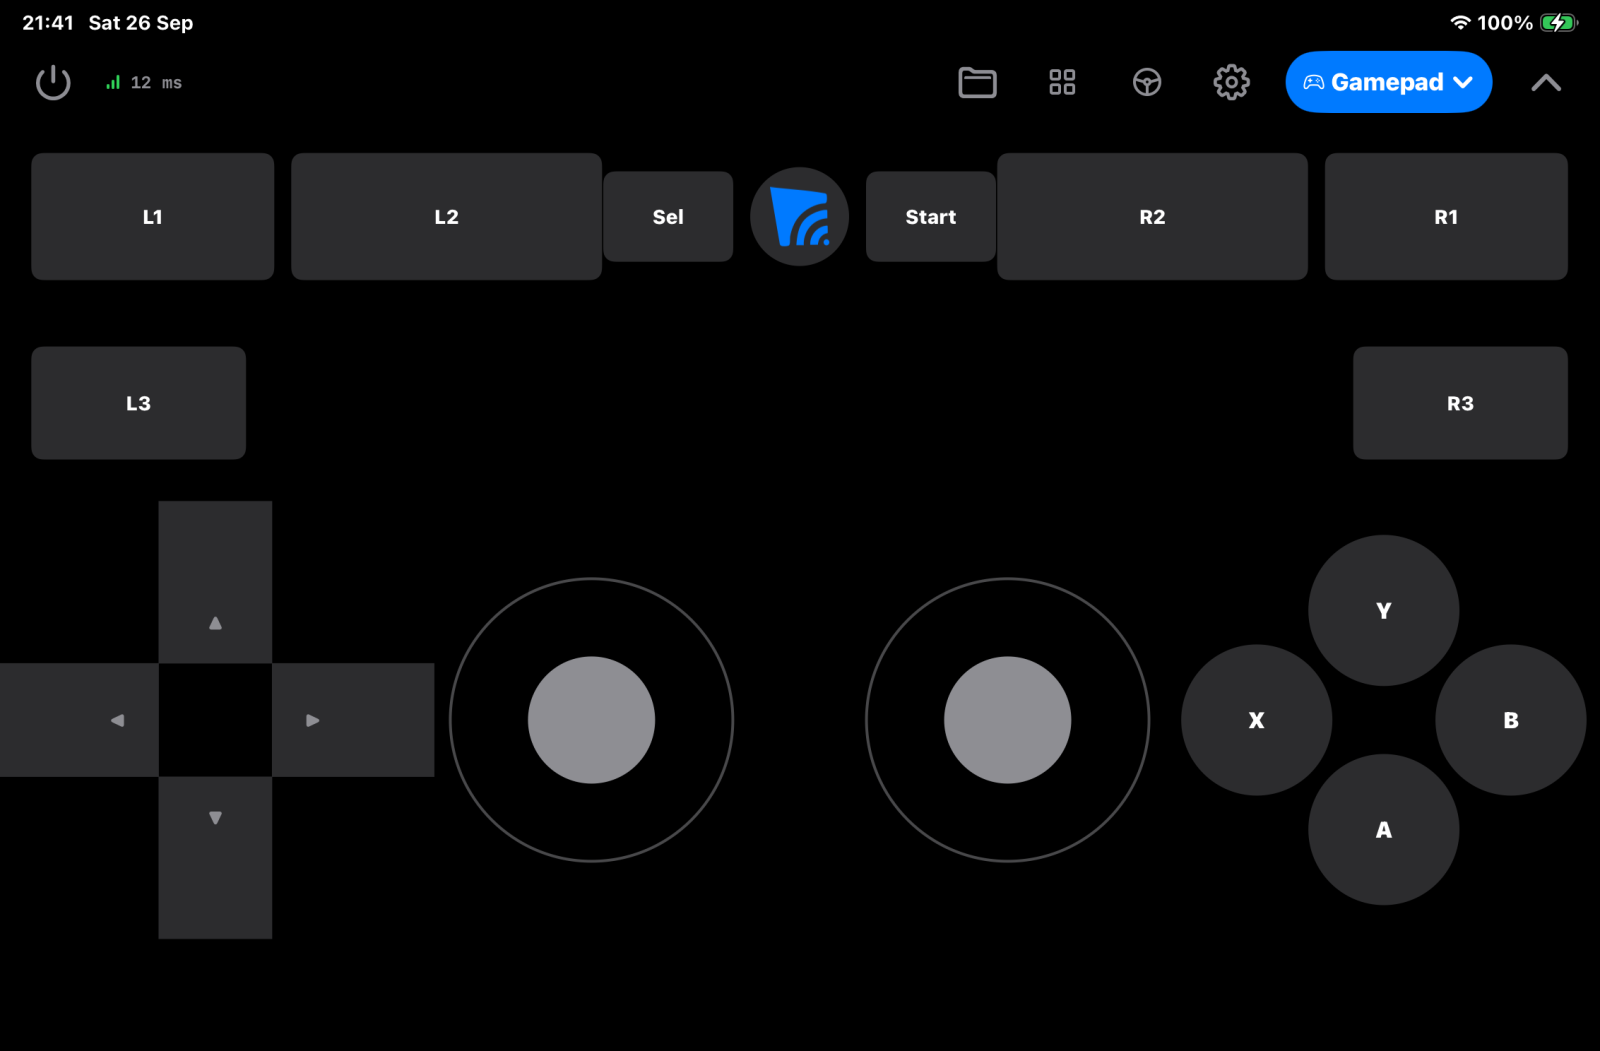
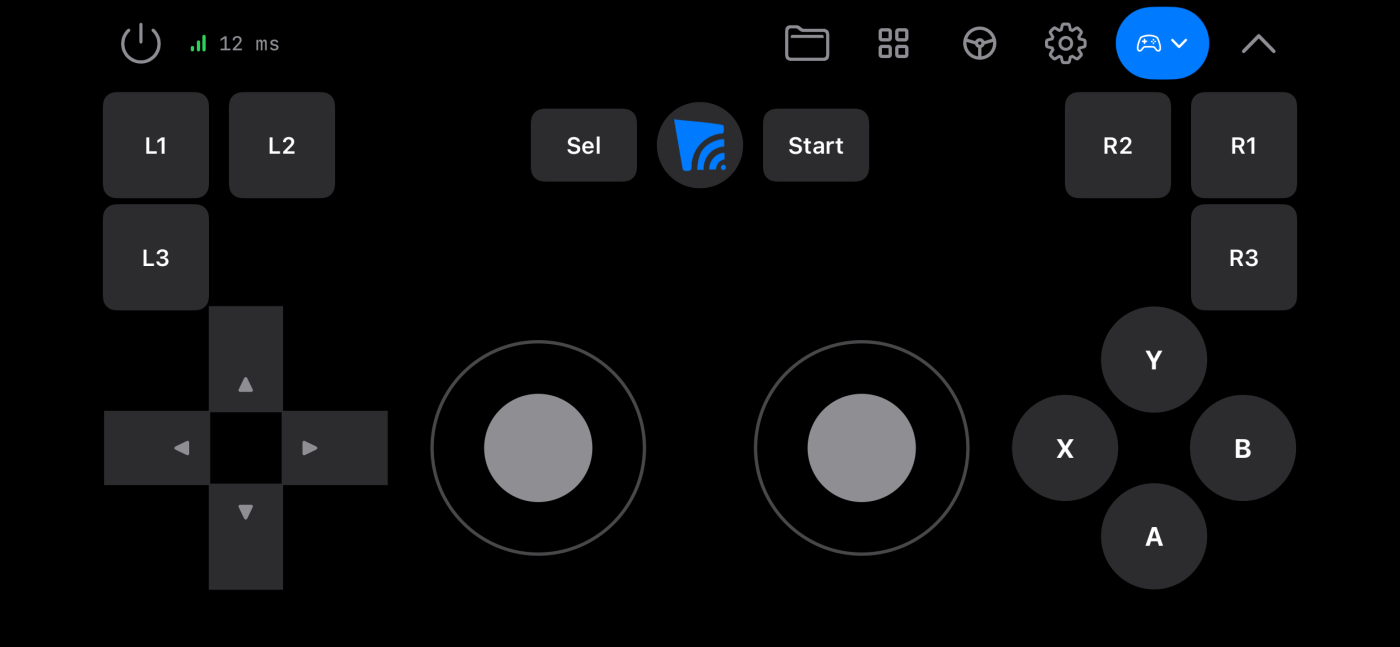
The toolbar has these items, from left to right:
| Item | What it does |
|---|---|
| Power button and connection status | The same as in the other modes. See Connection state. |
| Layouts (folder) | Opens the list of layouts. See Save and select layouts. |
| Edit layout (grid of four squares) | Opens and closes the layout editor. See Change the layout. |
| Steering Wheel | Turns the steering wheel on or off. See The steering wheel. |
| Settings (gear) | Opens the app settings. |
| Mode button (Gamepad) | Changes to a different mode. |
| Hide toolbar | Hides the toolbar. To show it again, tap the tab at the top center of the screen. |
On a narrow toolbar, for example on an iPhone in portrait, some items move into a menu. Layouts, Steering Wheel and Settings are then in the More controls menu (a circle with three dots).
The first time that you open gamepad mode, a guide points at Edit layout and then at Layouts. Tap Next, then Got It.
The controls
The Standard layout has 16 controls. The table gives the name of each control on an Xbox controller, which is what Windows sees.
| In the app | Type | On the computer |
|---|---|---|
| Left stick | Analog | Left stick |
| Right stick | Analog | Right stick |
| D-pad | Digital, four directions | D-pad |
| A B X Y | Digital | A, B, X, Y |
| L1 R1 | Digital | Left bumper (LB), right bumper (RB) |
| L2 R2 | Digital. A press is a full pull. | Left trigger (LT), right trigger (RT) |
| Sel | Digital | Back |
| Start | Digital | Start |
| L3 R3 | Digital | Left stick press, right stick press |
| Round button with the Ilopad logo | Digital | Xbox (Guide) button |
How the controls respond
- Sticks. Touch the stick circle. The knob goes to your finger. The farther your finger is from the center, the more the stick moves. When you lift your finger, the stick goes back to the center.
- D-pad. Touch an arm, or slide your finger from one arm to a different arm. The D-pad sends one direction at a time. It does not send diagonals. A touch at the center sends no direction.
- Buttons. A button stays pressed while your finger is on it. You can press many buttons at the same time.
- A touch stays with its control. If you slide your finger off a button, the button stays pressed until you lift your finger. A slide onto a different button does not press it.
- Haptic feedback. A button or a custom key gives a light tap when you press it. The sticks and the D-pad give no tap. To turn it off, see Gamepad settings.
To use L3 or R3, press the L3 or R3 button. A press on the stick circle does not send L3 or R3.
The steering wheel
The steering wheel uses the motion of the device to move the left stick. Use it for driving games.
- Hold the device in landscape, in the position that you want as the center.
- Tap Steering Wheel in the toolbar. The button shows that it is on.
- Tilt the device to the left or to the right to move the stick left or right.
- Tilt the device forward or back to move the stick up or down.
- To stop, tap Steering Wheel again. The left stick goes back to the center.
- Center. The position of the device when you turn on the steering wheel is the center. To set a new center, turn the steering wheel off and on again.
- Range. A tilt of 45 degrees from the center moves the stick fully. You cannot change this angle.
- Orientation. The steering wheel locks the screen in its current landscape orientation. When you turn it off, the screen can turn again.
- Invert. If the left stick of the layout has Invert stick Y axis on, the steering wheel also sends the inverted direction.
The steering wheel is off each time that you open gamepad mode.
Custom keys
A custom key is a button that sends keyboard keys to the computer, not controller buttons. Use it for a game action that has no controller button, for example a map key or a menu key.
Add a custom key
- Tap Edit layout in the toolbar.
- Tap Add key, the key cap icon below the Edit layout button.
- On the New Button screen, type a name in Button name. The key shows this name.
- Tap Add Action.
- On the Custom Shortcut screen, tap the modifiers and the keys.
- Tap Add Keys.
- Tap Save. The new key appears at the center of the screen.
- Drag the key to its position.
- Tap Edit layout to save the layout.
The keys of one action go to the computer together, as one shortcut. A key can have more than one action, and each action can stop or continue. This is the same editor as for the buttons in pencil mode. For all the details, see The button editor.
Change or delete a custom key
- Tap Edit layout.
- Tap the custom key to select it.
- To change it, tap the key again, or tap the pencil button below it.
- To delete it, tap the red button with the cross below it. Then tap Delete.
A custom key is part of the layout. It is in the portrait and the landscape arrangement of the same device. You can put it in a different position in each orientation. When you delete it, it goes from the two orientations.
Change the layout
In the layout editor, you can move, resize and hide each control, and add custom keys.
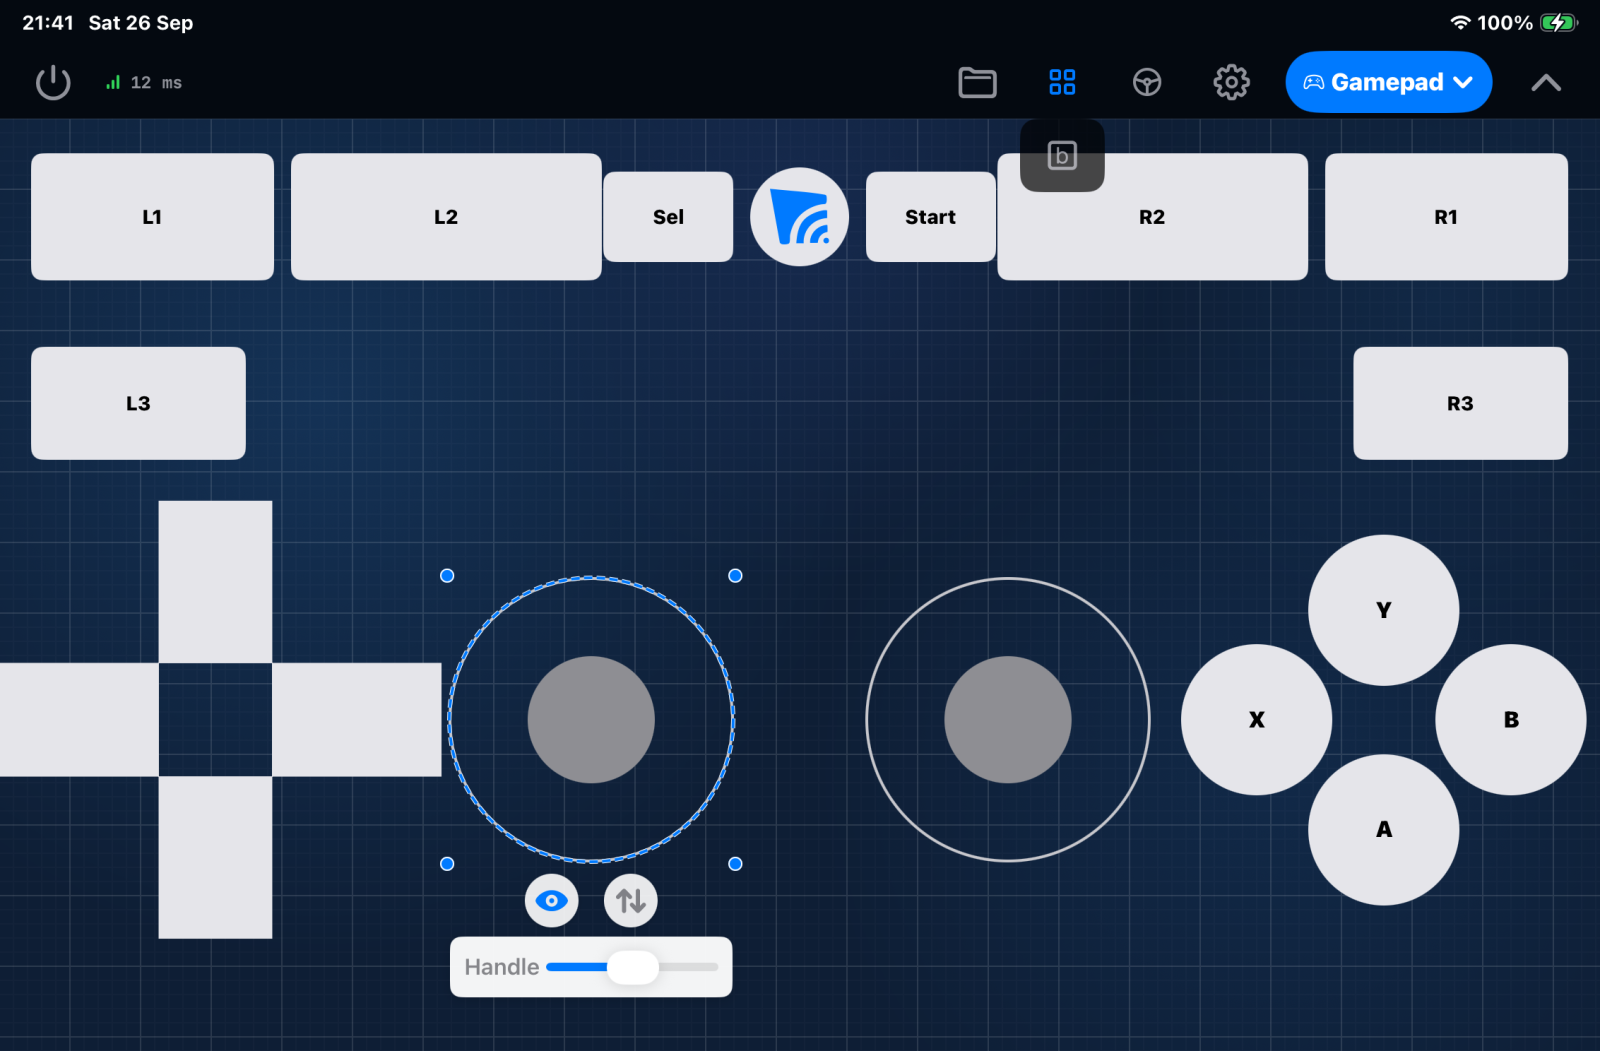
- Tap Edit layout in the toolbar. The controls show on a blue grid.
- Tap a control to select it. A ring shows around it, and a row of round buttons shows below it.
- Make your changes. The table below gives each change.
- Tap Edit layout again. The app closes the editor and keeps your changes.
| To do this | Do this |
|---|---|
| Move a control | Drag it. Lines show when an edge aligns with a different control. A control cannot go outside the grid. A control that is too small to grab shows a move handle in its row: drag the handle. |
| Resize a control | Drag one of its corner dots. Each type of control has a minimum size. |
| Hide or show a standard control | Tap the eye button. A hidden control shows with a cross in the editor. It does not show on the gamepad screen. You cannot delete a standard control: hide it. |
| Invert the up and down direction of a stick | Select the stick. Tap the button with the up and down arrows. The button is colored when the inversion is on. |
| Change the D-pad shape | Select the D-pad. Move the Spread slider. More spread moves the four arms apart, and makes the center area that sends no direction larger. |
| Change the stick knob | Select a stick. Move the Handle slider to make the knob larger or smaller. |
| Round the corners of a custom key | Select the key. Move the Radius slider. |
| Add a custom key | Tap Add key. See Custom keys. |
You cannot add a standard control. If you hide one, show it again with the eye button.
The Standard layout
The app includes one layout, Standard. You cannot change it. If you change Standard in the editor, the app saves your changes as a new layout. Its name is Custom Layout. If that name is already in use, the app adds a number, for example Custom Layout 2. The new layout becomes active. If you open and close the editor without a change, the app makes no copy.
If you edit a layout that you saved, the app keeps your changes, also when you change mode or close the app. It does not write them into the saved layout until you tap Overwrite "name" or Save As…. To go back to the saved version, tap Revert "name". See Save and select layouts.
Orientation and device size
Each layout keeps a separate arrangement for portrait and for landscape. It also keeps a separate arrangement for four device sizes: small iPhones such as the iPhone SE, other iPhones, the iPad mini, and larger iPads.
- The editor changes only the arrangement for the current device and the current orientation.
- To change the other orientation, turn the device while the editor is open. The editor keeps the changes that you made in the first orientation.
- Custom keys and Invert stick Y axis apply to the two orientations.
Save and select layouts
You can keep a different layout for each game. Tap Layouts in the toolbar to open the list.
- Standard is first. It shows Built-in. You cannot rename or delete it.
- Your layouts follow, in alphabetical order. Each row shows the number of controls.
- A check mark shows the active layout.
| To do this | Do this |
|---|---|
| Use a layout | Tap its row. If you have changes that you did not save, the Unsaved changes message shows. Tap Discard to load the layout and lose the changes. Tap Cancel to keep the changes. |
| Save the current layout as a new layout | Tap Save As…. Type a name, then tap Save. The new layout becomes active. |
| Write the current controls into the active layout | Tap Overwrite "name". This shows only when one of your layouts is active. |
| Go back to the last saved version | Tap Revert "name", then Revert. |
| Rename a layout | Tap the button with three dots on its row, then Rename. Or swipe the row to the left. |
| Delete a layout | Tap the button with three dots on its row, then Delete. Or swipe the row to the left. Then tap Delete again. |
If you delete the active layout, Standard becomes active. Tap Done to close the list.
The app keeps your layouts on the device. The same layouts are available for all servers. They do not go to your other devices.
Gamepad settings
Gamepad mode has no page of its own in Settings. The Settings button in the gamepad toolbar opens the main Settings screen. These settings change gamepad mode:
| Setting | Where | What it does | Default |
|---|---|---|---|
| Haptic Feedback | Settings, General | Gives a light tap when you press a button or a custom key. | On |
| Steering Wheel | Gamepad toolbar | Moves the left stick when you tilt the device. | Off |
| Invert stick Y axis | Layout editor, row of a stick | Sends the up and down direction of that stick inverted. Each stick and each layout has its own setting. | Off |
| Spread | Layout editor, D-pad | Moves the arms of the D-pad apart. | Lowest: the arms touch |
| Handle | Layout editor, stick | Sets the size of the stick knob. | Middle |
| Radius | Layout editor, custom key | Sets how round the corners of the key are. | Lowest: the same corners as the other controls |
| Don't show this again | The gamepad card: Gamepad needs a driver or Gamepad not available on this computer | Stops the card when it opens without a request from you. When you select Gamepad in the mode menu, the card always opens. | Off |
For Keep Screen Awake, Auto-Hide, Hide Delay and the other settings of the app, see General settings.
Limits
| Subject | Limit |
|---|---|
| macOS | Gamepad mode is not available when you connect to a Mac. |
| Windows | Gamepad mode needs the ViGEmBus driver. The computer sees an Xbox 360 controller. That controller has no Share button. |
| Number of controllers | The server makes one virtual controller for each computer. If two devices are in gamepad mode, they control the same controller. You cannot use two devices as two players. |
| Triggers | L2 and R2 are digital. A press sends a full pull. You cannot pull a trigger halfway. |
| D-pad | One direction at a time. No diagonals. |
| Vibration | A game cannot make the device vibrate. The haptic tap comes from the app, not from the game. |
| Motion | The game does not receive the motion of the device. Only the steering wheel uses the motion, and it moves only the left stick. |
| Custom keys | A custom key sends a tap of its keys. It cannot hold a key down. |
| App in the background | When the app goes to the background, it releases all buttons and puts the two sticks back at the center. |
| Connection lost | When a device disconnects, the server releases each controller button that the device held. |
| Steering wheel | Landscape only. The full tilt is 45 degrees, and you cannot change it. |
Test the gamepad
The Input Testing window of the server has a Gamepad tab. It shows the buttons and the sticks that the server receives from the app. For the steps, see Test the input: Gamepad.
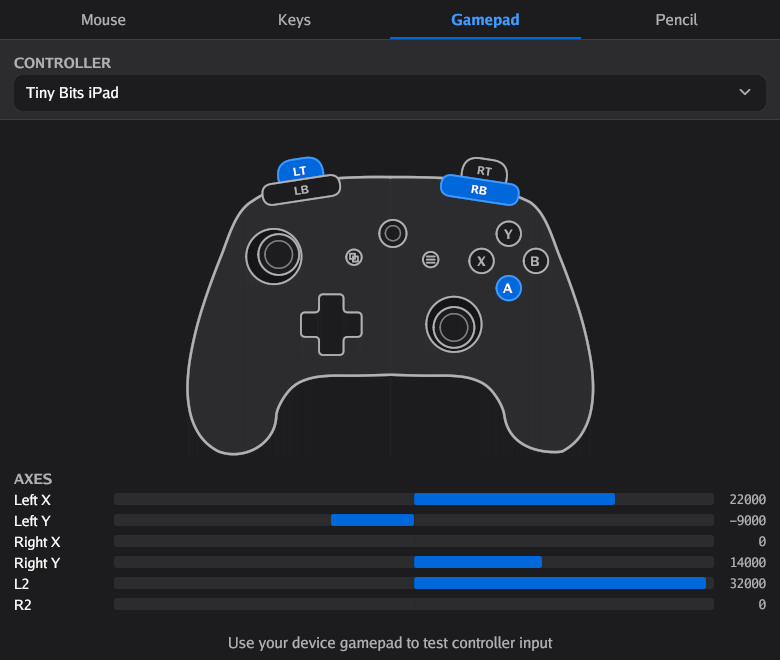
The device shows in the list after its first gamepad input. Until then, the tab shows No controllers connected.
On Windows, the tab shows that the input arrives at the server. To examine the Xbox controller itself, use a game or a controller test program.