On this page
The Servers list
The Servers list shows each server that you paired. Each row shows the server name, the last network address and a status.
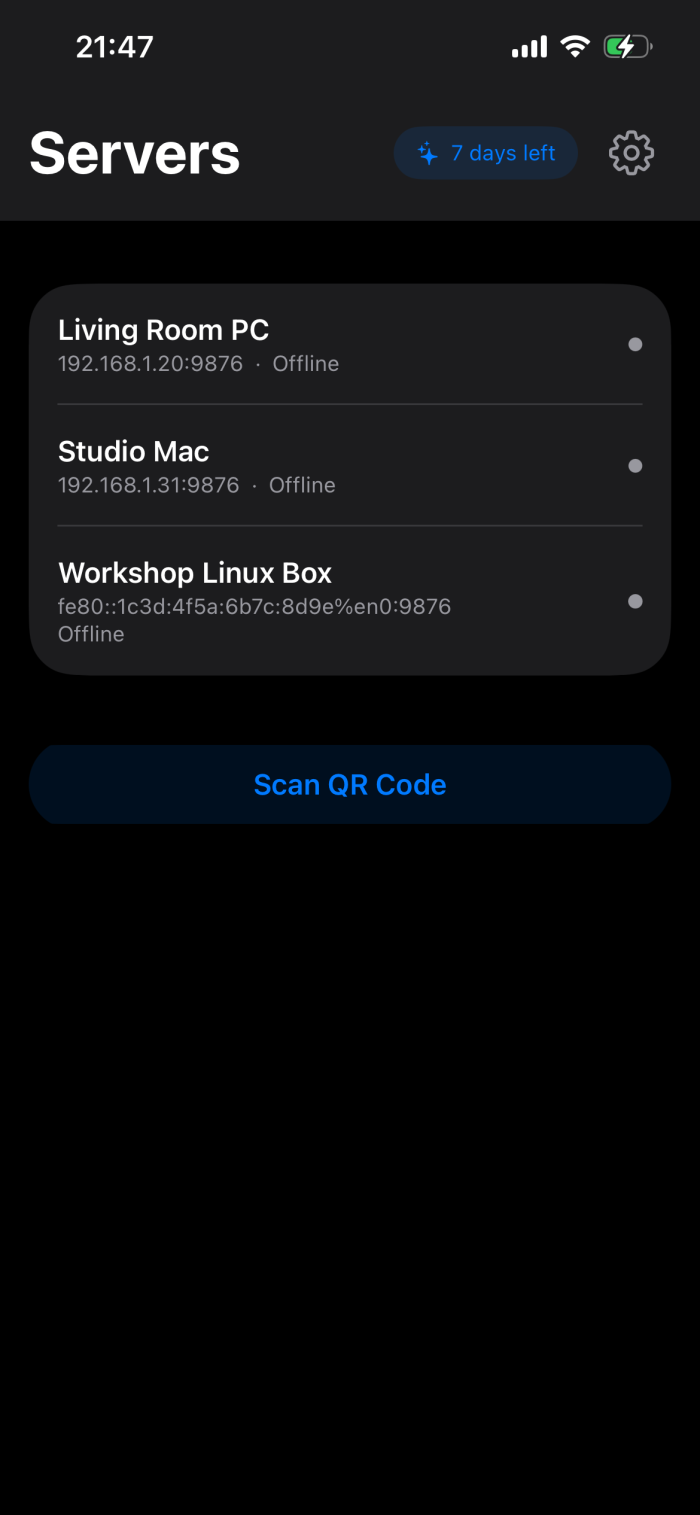
| Status | Meaning |
|---|---|
| Checking… | The app looks for the server on the network. The dot is an empty circle. |
| Online | The server is running, and the app can see it on the network. The dot is green. |
| Offline | The app cannot see the server on the network. The dot is gray. You can still tap the row: the app then tries the last address. |
| Connecting… | The app connects to this server. A stop button shows at the end of the row. |
To connect, tap a server. While the app connects, the other rows are dim and you cannot tap them. To stop the attempt, tap the stop button (×) at the end of the row. If the connection fails, the app shows Can't connect and the cause. See Messages in the app.
Add a device to the server
To pair a device, you make a QR code on the server and scan it with the app. Do these steps one time for each iPhone or iPad.
Before you start, install the server on your computer (see How to install) and the app on the iPhone or iPad. Connect the computer and the device to the same network.
On the computer
- Open the server window. It opens when you start Ilopad. If you closed it, click the Ilopad icon in the system tray (on macOS, in the menu bar). If a menu opens, click Open Configuration.
- Click the + button at the top right of the window. Its tooltip is Add a device. If no device is paired, you can also click Add Device in the middle of the window.
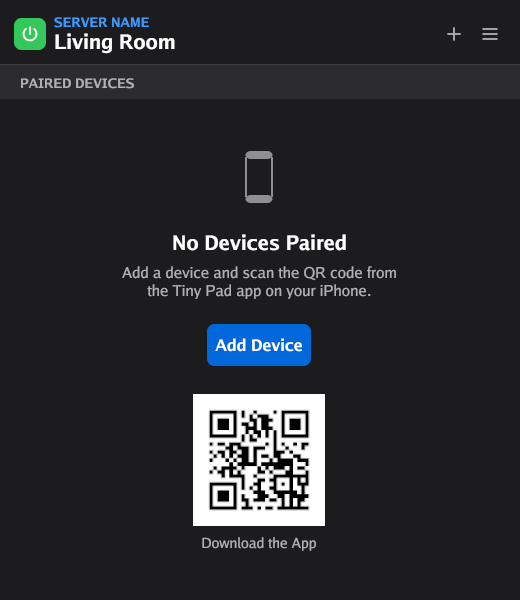
The server window before you pair a device. The small QR code at the bottom opens the Ilopad website. It does not pair a device. - Under Name this device, type a name, for example My iPhone.
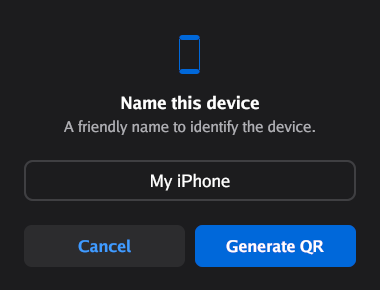
Type a name that helps you find the device in the list. - Click Generate QR, or press Enter. A window with the QR code opens.
The name identifies the device in the server window. The app does not show it.
If you are on a Linux desktop without a system tray, the server window opens when the server starts. If you close that window, the server program closes.
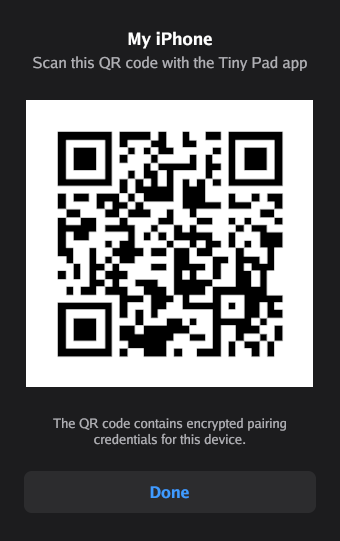
Pair with the server
- Open the Ilopad app on your iPhone or iPad. The first time, read the welcome screen and tap OK.
- On the Servers screen, tap Scan QR Code.
The Scan QR Code button is below the list. The first time, the screen shows No servers paired yet, and the button is below that text. - If iOS asks for access to the camera, allow it.
- Point the camera at the QR code on the computer screen. The app reads the code automatically. You do not have to tap a button.
- The app connects immediately and opens the current mode.
- On the computer, click Done to close the QR code window.
The server adds the device to its list when you click Generate QR. The row shows Never connected until the device connects for the first time.
Other ways to pair
The app has only one way to pair: it scans the QR code. You cannot type a code or an address.
If you did not allow the camera, the scanner shows Ilopad can't use the camera. Tap Open Settings. iOS opens the settings for Ilopad. Turn on Camera, go back to the app, and tap Scan QR Code again.
The app can refuse a code. For this problem, see Pairing problems. The server can also show No Network Address when you click Generate QR. See No Network Address.
Connection state
On the computer
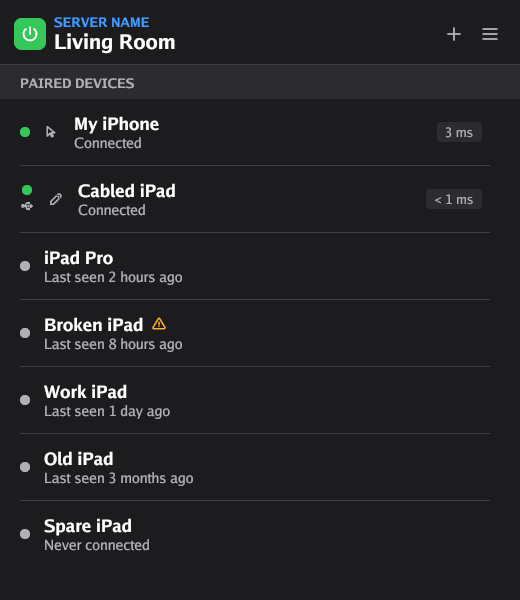
The server window shows a row for each paired device, under PAIRED DEVICES. Connected devices are at the top. The other devices follow, the most recent first.
| You see | Meaning |
|---|---|
| Green dot, Connected | The device is connected. An icon shows its mode: touchpad, pointer, pencil or gamepad. The box at the right shows the latency, for example 3 ms or < 1 ms. |
| USB icon under the green dot | The device is connected with a USB cable. |
| Gray dot, Last seen | The device is not connected. The row shows when it was last connected, for example Last seen 2 hours ago. |
| Gray dot, Never connected | The device is paired, but it did not connect yet. |
| Warning icon after the name | The server cannot use the saved key for this device. The device cannot connect. Pair it again. |
The latency is the time that a message takes from the device to the computer and back.
In the app
When the app is connected, its toolbar shows the power button, then the connection quality and the latency. The quality is a set of three bars.
| Quality | Bars | Latency |
|---|---|---|
| Good | 3, green | Less than 50 ms |
| Fair | 2, yellow | 50 ms to 150 ms |
| Poor | 1, red | More than 150 ms |
| Disconnected | 0, with a line through them | No value |
When the app uses a USB cable, a cable icon shows after the latency.
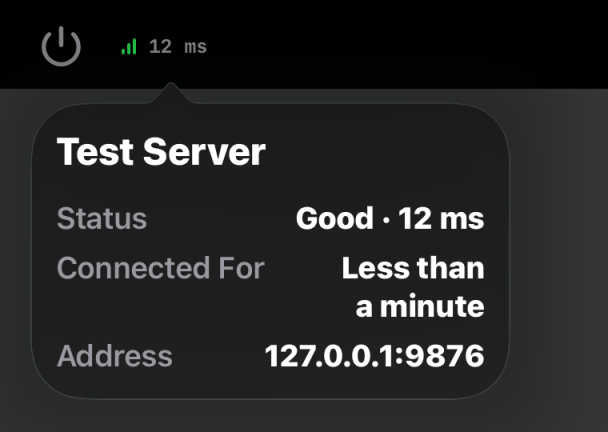
Tap the bars or the latency to see the connection details. The box shows the name of the server, then these rows:
- Status: the quality and the latency.
- Connected For: how long this connection is up.
- Receiving: how much data the app receives each second.
- System: the operating system of the computer.
- Address: the network address of the server.
- Screen and Active App: only in pencil mode. The size of the computer screen, and the app that is in front on the computer.
- Gamepad: only when gamepad mode cannot work on this computer.
- USB: only when the app cannot open its USB connection. The row gives the cause.
If the connection has a problem, a label shows on the screen:
- Reconnecting…: the connection is lost. Your input does not get to the computer. The app tries to connect again automatically.
- Weak connection: the network has a problem for a moment, but the connection is up. Your input still gets to the computer. You can continue to work.
If the app stays on Reconnecting…, see A weak or slow connection.
Connect with a USB cable
A USB cable gives a connection that does not depend on the Wi-Fi. There is no setting to turn it on. The app always uses a cable when it can.
- Connect the app to the server over the network, as usual.
- Keep the app open on the screen of the device.
- Connect the device to the computer with a USB cable.
- Wait a moment. The app moves the connection to the cable, and a cable icon shows in the toolbar.
In the server window, the row of the device shows a USB icon under the green dot.
When you disconnect the cable, the app goes back to Wi-Fi automatically. When you put the app in the background, it closes the cable connection. When you open the app again, it connects again.
The computer needs Apple's USB service for iPhone and iPad:
| Computer | What you need |
|---|---|
| Windows | The Apple Devices app from the Microsoft Store, or iTunes. |
| macOS | Nothing. macOS has the service. |
| Linux | The usbmuxd package. Some package managers install it with the server. Others do not. |
Several devices and several servers
Several devices on one computer
- Pair each device on its own. Each device gets its own row and its own QR code.
- More than one device can connect at the same time. The Max Connections setting on the server sets the limit. The default is 3. See General settings of the server.
- When the number of connected devices is at the limit, the server refuses the next device.
- Each device selects its own mode. All connected devices control the same computer: the same pointer, the same keyboard and the same screen.
Several computers
- You can pair the app with more than one server. To add a server, scan the QR code of that server. Each server shows in the Servers list.
- The app connects to one server at a time.
- When you open the app, it connects to the server that you used last.
- Each server has its own pairing on the computer. Add the device on each server.
To change to a different server:
- In the toolbar of the app, tap the power button. The app disconnects and shows the Servers list.
- Tap the server that you want.
The app keeps some settings separately for each server, for example the touchpad and pointer sensitivity. See Settings for each server.
Pair a device again
Pair a device again when:
- The server window shows a warning icon after the name of the device.
- The app shows Connection failed. Try re-pairing with the server.
- You removed the server from the app, and you want to use it again.
- You changed the server name, and you want the app to show the new name.
You do not have to delete the device first. The device keeps its row and its name.
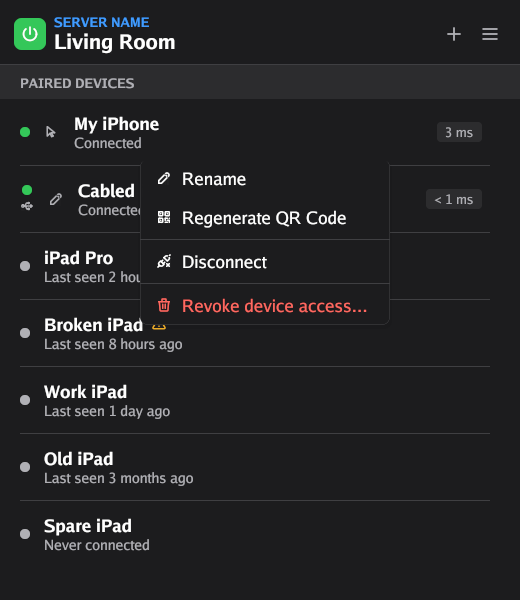
- In the server window, click the row of the device. A menu opens.
- Click Regenerate QR Code.
- The server asks Re-pair "name"? Click Continue. A new QR code shows.
- In the app, go to the Servers list and tap Scan QR Code.
- Scan the new QR code.
- On the computer, click Done.
Rename a device
- In the server window, click the row of the device. A menu opens.
- Click Rename.
- Under Device Name, type the new name.
- Click Save, or press Enter.
The name is only on the server. The app does not show it, and the connection does not change. The name cannot be empty.
The server name
The server name identifies the computer in the app. The first time that the server starts, it uses the host name of the computer. You can change it.
You see the server name in these places:
- In the server window, at the top, under SERVER NAME.
- In the app, in the Servers list.
- In the app, at the top of the connection details.
Change the server name
- In the server window, click the server name. A pencil icon shows when you move the pointer on it.
- Under Server Name, type the new name.
- Click Save, or press Enter.
The name cannot be empty. The server keeps a maximum of 64 characters and removes the rest.
What the name changes
- The server puts its name in each QR code. The app keeps the name that was in the QR code when you scanned it.
- Thus a device that is already paired continues to show the old name. To show the new name on that device, pair it again.
- A device that you pair after the change shows the new name.
- The name does not change the host name of the computer.
- The name does not change how the app finds the server. Paired devices continue to connect.
You cannot rename a server in the app.
Remove a device or a server
Remove a device on the server
- In the server window, click the row of the device. A menu opens.
- Click Revoke device access....
- The server asks Delete "name"? Click Delete.
The app on that device still shows the server in its list. If you scan a new QR code from this server, the app replaces the old pairing. You can also remove the server from the app.
Remove a server in the app
- If the app is connected, tap the power button in the toolbar. The app shows the Servers list.
- Swipe left on the row of the server.
- Tap Delete.
- The app asks Unpair server. Tap Unpair.
The app deletes its pairing with the server and the settings that it keeps for that server. You cannot remove a server while the app connects to it.
The server does not know that you removed it. It keeps the device in its list. To use the server again, open the menu of the device in the server window and click Regenerate QR Code. Then scan the new code. If you do not want the device on that server, delete it there too.
Disconnect for a short time
- In the app: tap the power button in the toolbar. The app stays disconnected until you tap a server in the list.
- On the server: click the row of a connected device, then click Disconnect. The server shows Device disconnected. The app does not stop: it connects again automatically. To keep a device away, delete it, or stop the server.
Stop and start the server
The power button is at the top left of the server window, before the server name.
- A green button with a white symbol: the server runs. The tooltip is Stop the server.
- A gray symbol with no fill: the server is stopped. The tooltip is Start the server.
To stop the server, click the power button when it is green. The server then:
- Disconnects all devices.
- Stops listening on the network. No device can connect, also over a USB cable.
- Keeps all pairings. The server window stays open.
A device that was connected shows Reconnecting… and continues to try. The time between two tries increases, to a maximum of 30 seconds. In the Servers list of the app, the server shows Offline.
To start the server again, click the power button. A device that is still on Reconnecting… connects again automatically at its next try. If you tapped the power button in the app, tap the server in the list.